A quick one for today. I do not use Gnome myself, but I keep a close eye on what’s going on. Recently @DistroTube made a video about an extension that most of you out there might like, so I thought, why not post about it here…
Tiling Shell Information
This is a Gnome Shell extension implementing modern windows tiling system by extending GNOME’s default 2 columns to any layout you want! Can be installed on Gnome Shells from 40 to 46 on X11 and Wayland: the most recent GNOME Shell is supported, and older releases will include all the features and bug fixes!
- 🤩 First and only extension that provides Windows 11’s snap assistant
- 🖥️🖥️ multiple monitors support, even with different scaling factors!
- ⚙️ Manage, edit, create and delete layouts with a built-in editor
- 💡 Layouts are not strict, you can span multiple tiles if you want
- 🚀 Automatically sets the same UI of your GNOME theme, for a seamless integration!
Tiling Shell Installation
Before I tell you how to grab it, let me caution you with this…
With that out of the way, I say this coz many have tried grabbing it from the AUR only to suffer maintainers lagging behind on updates. It’s better to get it straight from source rather than rely on a 3rd party maintainer (man in the middle).
If you are using the XeroLinux toolkit, I added an option that will install everything you need to start customizing your Gnome experience. Which includes the Extension Manager application, that can be found under the 4 : System Customization menu.
Now that you got the extension installed, here’s some usage tips.
Tiling Shell Usage
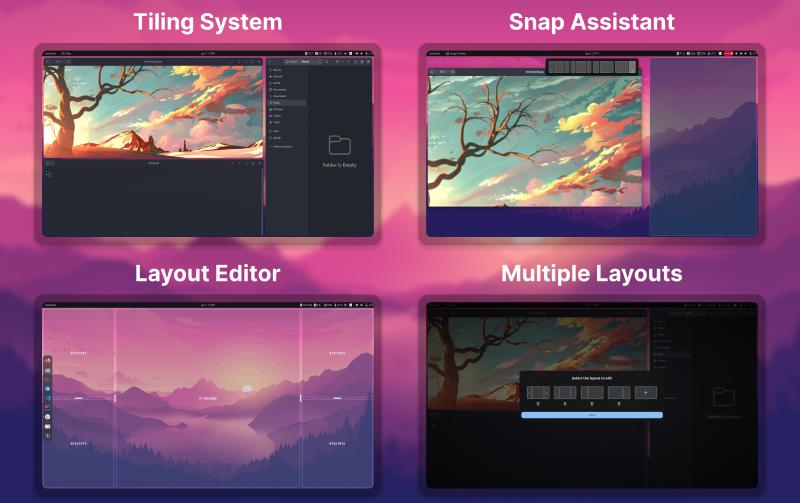
- Tiling System
When grabbing and moving a window, press CTRL key to show the tiling layout (you can choose another key from the preferences). When moving on a tile, it will highlight. Ungrab the window to place that window on the highlighted tile.
This extension and the tiling system also implements Windows PowerToys FancyZones!
- Snap Assistant
When grabbing and moving a window, the snap assistant will be available on top of the screen. Move the window near it to activate the snap assistant. While still grabbing the window, move your mouse to the tile you are interested in. By stopping grabbing the window will be tiled to the selected tile!
- Select a layout
Click on Tiling Shell’s panel indicator and the available layouts will be shown. Select the one you prefer by clicking on it. That layout will be applied to every monitor in case you have more than one.
- Select multiple tiles
The layout is not strict. You can select multiple tiles too! Just hold ALT while using the tiling system (you can choose another key from the preferences).
- Split a tile :
LEFT CLICK - Split a tile vertically :
LEFT CLICK+CTRL - Delete a tile :
RIGHT CLICK - Save, or open the menu : Click the tray icon
- Smart resize
You can resize adjacent tiled windows together!
It can be enabled/disabled from the preferences
- Tile using Keyboard
Move window through the tiles using keyboard shortcuts (SUPER+←/↑/↓/→). They can be customized from the preferences!
- Edge Tiling
You can tile a window by moving it to the edge.
Wrapping up
That covers the basics. Now I just copy pasted from project Git, where you will find much more info, and can report issues should you encounter any. Here, I linked it below..
Even though I do not like or use Window Tiling myself, I think the developer behind this extension was heavily inspired by Windows’ PowerToys Fancy Zones. I do not find this wrong in the slightest, on the contrary, it’s one of Windows’ best features IMO. It’s nice to see it make its way to Linux.
With Windows constantly shooting itself in the foot, it’s fun to see its most useful parts being cherry picked and ported to Linux. Windows’ loss is Liinux’s gain lol. Well, I hope you enjoy this neat little extension…
Honorable mention
As a bonus, I would like to mention another Tiling extension. But before I mention which, I want you to keep in mind that sometimes this extension, like many others tends to lag behind major Gnome releases, so for example when Gnome 47 lands, you will have to disable it and wait a while before it’s updated adding in support.
Now, with TilingShell covering newcomers from Windows, the extension am talking about here, is none other than Forge, specifically targeted to those coming from a Tiling Window Manager, who prefer that way of doing things.
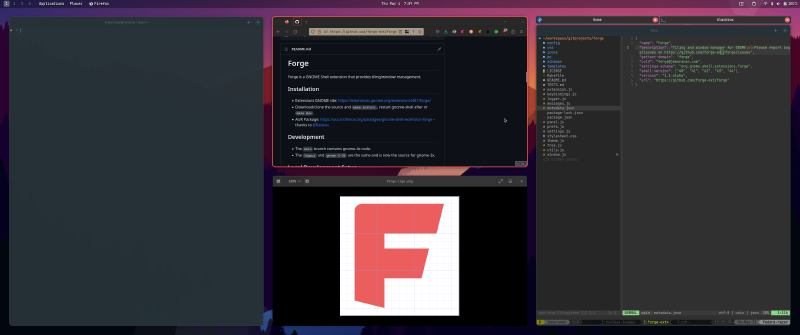
To install it use the aforementioned Extension Manager app. For more information about its features and how to use it, link to project’s Git found below. Enjoy your experience on Gnome my fellow FOSS G33ks…
That’s it folks…
Cheers !